Friday, August 1, 2014

Golden Renaissance. Lucretia.

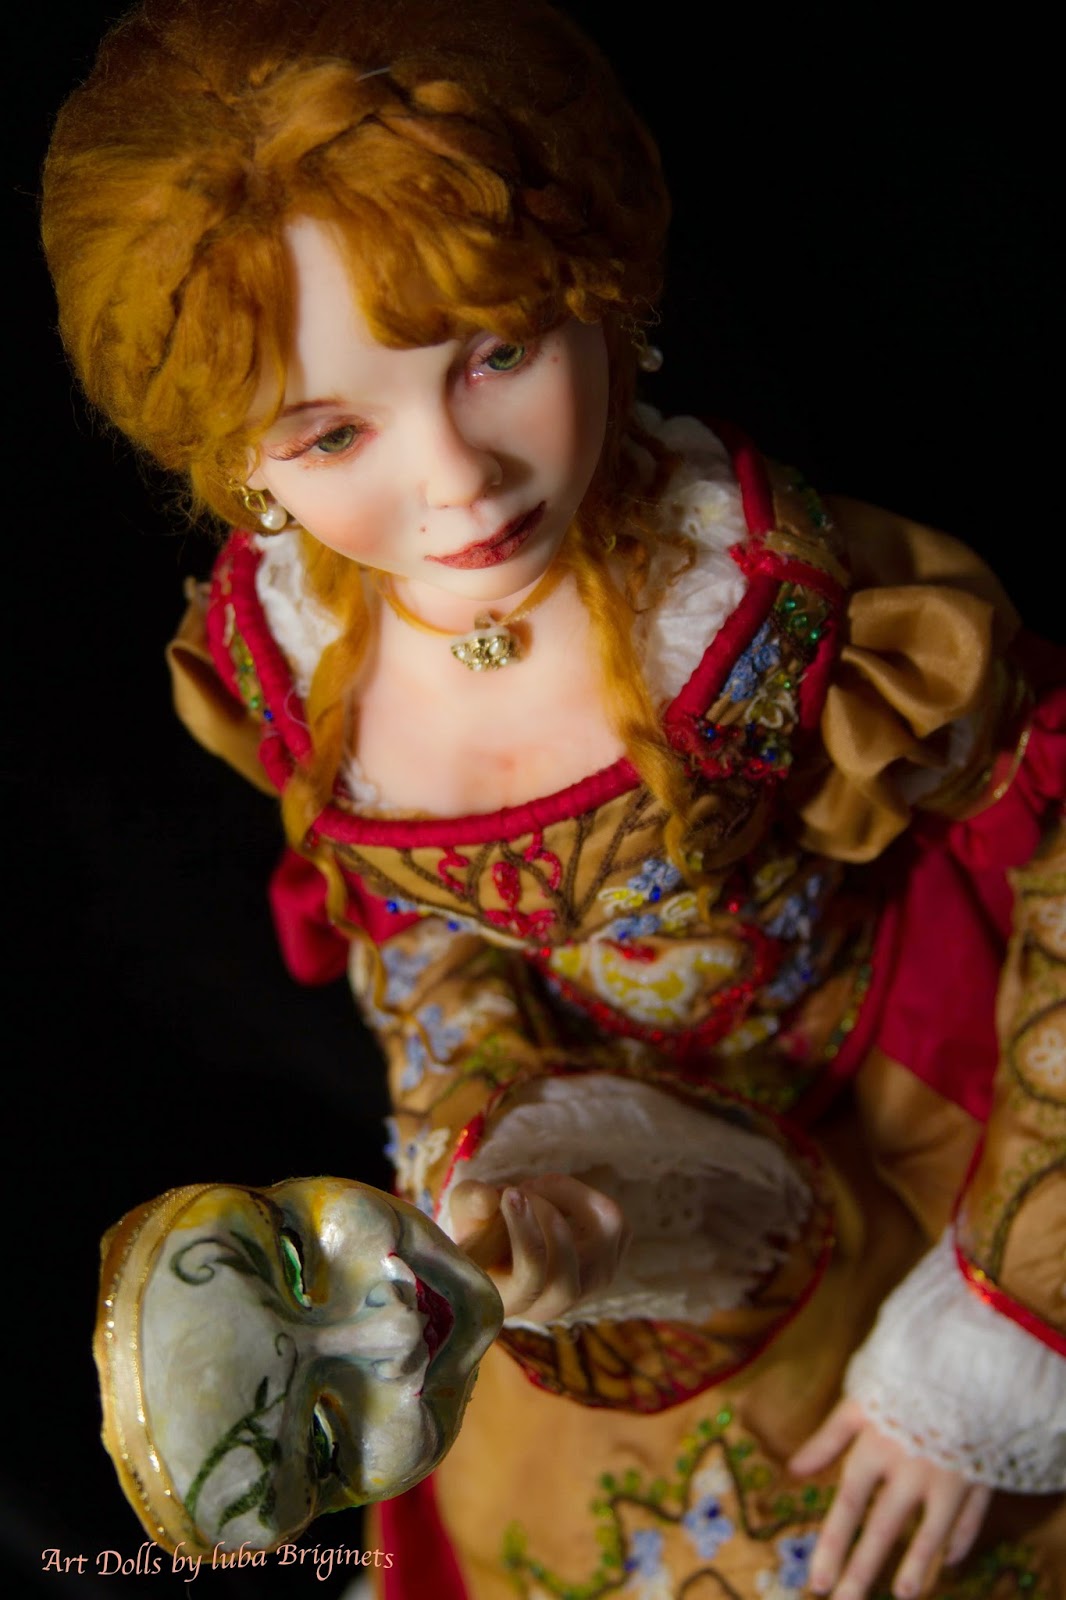
I finished one of the most complex of my works so far. Lucretia was inspired by the Renaissance Era.

I have already wrote about the making in the earlier entries, so I will not say much here.

Here is the link if you would like to find out more about the process.

Instead, I am posting the wonderful pictures, that are made by my talented husband. I hope you enjoy them!


Wednesday, July 9, 2014

Yet, Another Little Head…

 I have been working hard to finish lovely Lucretia's dress, but I just had to switch to sculpting! All this bead embroidering is sure fun, but it is getting tedious if it takes long.


Honestly, I don't know yet who it is, there is no name…I think she is rather cute! Names are hard, though. Any suggestions?

Thursday, June 26, 2014

Lucretia, The Renaissance Doll

I wanted to create something Renaissance themed for a very long time. The Italian Renaissance is one of my favorite time periods for very many reasons. I am sure I am not the only one, who admires this glorious era.


The little Lucretia is my modest tribute to the "Golden" period. Yes, "Golden" is the key word here, because Lucretia is nothing if not "golden". The golden hair and shimmery golden silks are definitely her style.

Since she was nothing but a lump of polymer clay and a pair of glittery green eyes, she completely captivated me and took full charge of herself. She is in such a hurry to be born! So here we are so far!
Polymer of choice is "Fimo Puppen" Face and hands are gently "blushed" with the mix of
 heat set and regular oils,
and delicately touched with
colored pencils and "Fibercastle" permanent markers.
As I said, she took charge…
Shoes are partially cloth and "Sculpy" polymer
Legs and feet are sculpted in "Paperclay"


Lucretia is 23 inches (almost 60 sm.) tall,
she is completely posable, because she is
 mounted on flexible plastic armature.


Right in the middle of the process, I decided to change her hair color from soft blond to golden brown, It changed her character somehow…
 

                                          Here she is, fully assembled. Such a coquette! 


                                            Now I am starting on constructing her costume …


Her hair still needs more work,
but I will leave it alone for now.

Next step: a lot of embroidery and beads! I will show it off next time :)

Thursday, June 12, 2014

Lady Marie and Her Wolf

I finally finished this project that took me about four months to complete.

The title is "The Mysteries of Broceliande Forest" This is a composition of two figures.


The work is the tribute to Gillian Bradshaw's novel "The Wolf Hunt". The novel is based on "Lai de Bisckavret" by the12th century poet Marie de France. The story is set in 12th century, therefore I made my best to depict the clothes to reflect the style of the time.


My favorite part of this excellent novel, is the willingness of the main character, likable and brave Lady Marie, to overcome society's stereotypes and be able to face her deepest fears. 


One of such fears for her is the fear of wolves. However, when the incredible turn  of her life brings her face to face with one, she does not back out. It is a very strange wolf: he is wild animal and free spirit of the forest. Yet, he chooses to live among humans. Marie is able to look at the animal without prejudices of her time. As a result, she gains a loyal and loving friend. 


Moreover, Marie applies her  critical and open mind in solving the mystery of a disappearance of a noble knight, who once saved her life. Last time he was seen walking into the Briceliange forest to hunt, at least that what he told his newly wedded wife, and did not come out of it. He is believed to be dead, but Marie has her doubts. So she starts her own investigation.


Will Marie solve the mystery of Broceliande Forest? What will she discover? I can't tell this intriguing story better than Gillian Bradshaw already have. If you want to know more, read "The Wolf Hunt"  You will not regret it!

Friday, June 6, 2014

Summer Time: All Over The Place

Yes, it is wonderful to have more time for my passion for dolls. Summer is the best time for it! Schools are out, which means I have more opportunity to do what I truly love: make more dolls!

This makes me scattered all over the place: I have at least three on-going projects: "Lady Marie" and her "Mysterious Companion" are almost finished, I am just putting last touches on them and will dedicate the whole post to them exclusively, soon.
Here is a little sneak peek:


I am also working on my lovely mobile doll "Sunny" she is completely assembled at last, now working on her dress.


This new project is very exiting! Meet "Lucretia"! She is a "Renaissance Lady" I just started as a challenge for International Art Doll Registry show for July. Hopefully, I will finish her on time to enter!


Friday, May 16, 2014

"Petals" my May project

Ahh, spring! Gotta love it! Especially after this long gray winter that we just suffered. I was so happy to see bright sun and fresh green grass!


One of my good friends just got married, and now is getting ready to move far, far away… This little quick project ( it WAS quick) is for her, as a wedding gift.

I called this charming girl "Petals". She is inspired by May flowers and my friend Olga, the very girl "Petals" is created for. Olga is a wonderful dancer. Although "Petals" is not a portrait doll, I wanted to reflect Olga's light spirit and grace in this work.
Petals is 18 inches tall. She is mounted on flexible plastic armature ( my first so far). I found that I like it very much. Flexible plastic armature is easy to find in doll supply internet stores, it also comes in different sizes. It is not very expensive and easy to use. If you want to create "posable" doll, it is much better than wire. "Petals" easily changes her position. She can stand or sit without any trouble.

The lower legs, arms and head are hand sculpted in "Fimo Puppen" polymer clay.

The wig, dashing hat and dress are made with "recycle" materials:
I love to visit thrift stores that often carry devastated, broken and dusty porcelain dolls. I buy them very cheaply and reuse all I can. The dress went trough a lot of cleaning, alteration and change before it was refashioned for the doll.

Saturday, May 10, 2014

Tips and Tricks of Sculpting Clothes in Style


One of my wonderful "art doll" friends asked me how do I create clothes for my dolls. I am happy to share my knowledge and the result of experiments with you, hopefully it will help some. First, I have to say, that I "build in" the clothes into my dolls. So the clothes are not removable. That is one of the reasons why I like to make "soft" bodies, I sew the costume directly on.

If there is one thing that years of painful experience taught me, it is that you do not start without make something new without preparation and research first. For example, my latest project was intended to be the a"lady" in medieval style of clothes. It took me a while to surf the "Pinterest" and whole bunch of other sites to find the reference, which I did, and even managed to find simple pattern for the dress.

 Which brings me to tip # 1: if you are not very confident with sewing, do not try to make complex patterns, go for basic alternatives or simplify.
kirtle
Pattern bliaut
Here is what I found and decided that , yes, I can do that.
Tip #2 (from my own painful experience)
Make sure you carefully measure your doll and allow some extra for the seams,at least 1/4 inch, it will take extra fabric. Better to err on the larder then smaller side.


If you prefer, you may do the sewing entirely by hand, but I  sew largest parts on the sewing machine, which I think is essential, if you work with fabrics. Here is mine.


I love to add a little embroidery and bead sewing to my costumes, it is such fun! Almost therapeutic, if a little time consuming. I usually do embroidery on the machine, then sew beads in while TV watching in the evening.  Lovely!


Final alteration happens directly on the doll…


Then a little florist wire on the hem of the dress ….


…and this magic stuff that stiffens the fabric, letting the hems and folds of the dress to "float" and preserves it from dust and color loss. I use "Paverpol" transparent hardener. It almost doesn't change the color. HOWEVER…
Tip #3: ALWAYS try the hardener on a small sample of the fabric you are using first, to prevent unpleasant surprises, such as change the color and texture. I mix "Paverpol" with quite a bit of water (for this project I used three table spoons of the hardener for a cup of water)
then I evenly spray the stuff directly on the sculpture.

Still, the finished fabric lost some of the laster, however, added more contrast and emphasis on the texture. It also lost some of the "newness" and looks more "worn" that I think, looks more natural for this project.

Soon! Very soon You will see "Lady Marie" in her full glory! Right now I am working on her headdress.